Chapter 3 Raspberry Pi Installation
Purpose
This document describes how to set up a Raspberry Pi for the underlying demo devices described here:
Read those documents and come back to this section as necessary during the build process.
SD Card Setup
- Download Etcher and install it
- Download the latest Raspbian "Lite" image here
- Insert the SD card into your computer
- Run Etcher
- Select the Raspbian image .zip file
- Select the SD card as the target
- Wait for the image to be written to the SD card
- Physically remove the SD card from the computer and plug it into the Raspberry Pi
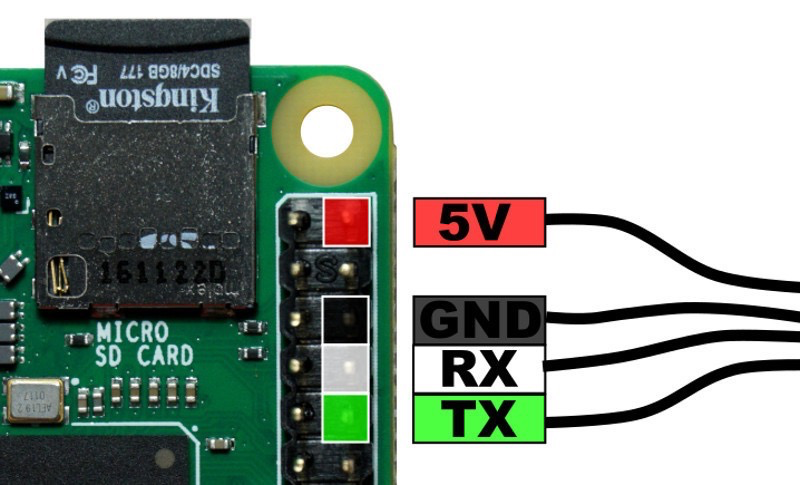
Pi Zero W Console Setup (Recommended)
- If you are setting up the Pi Zero W and don't have a micro HDMI adapter you can leave the SD card connected to your computer and edit
/boot/config.txtto enable the serial console by putting the following lines at the end of the file:
# Enable serial console
enable_uart=1
- Unmount the SD card and install it in the Pi Zero.
- Use a USB FTDI cable (RX to RX, TX to TX) and something like
minicom -D /dev/tty.usbserial-AH02M4JFto connect to the Pi Zero and you should see the boot-up sequence and eventually a login prompt

Initial Raspbian Setup
Connectivity and Console Access
- Connect the full-size Pi to a USB keyboard and HDMI monitor or use the USB FTDI cable with the Pi Zero W as described above
- Plug the Pi into power
- The full-size Pi (Serial DMS) will be powered using the DC barrel jack on the RGB Matrix Hat and the 4A 5V DC power supply
- The Pi Zero W (RWIS and Car Simulator) will be initially powered using the micro USB 2.4A 5V DC power supply
- Log into the Pi for the first time using the username
pipasswordraspberry
Raspi-Config
- Perform some basic system configuration
sudo raspi-config
- Localization Options
- Change Locale
- Unselect
en_GB.UTF-8 UTF-8 - Select
en_US.UTF-8 UTF-8 - Select
OK - Choose the US locale you just added as the default (
en_US.UTF-8 UTF-8) and thenOK
Each time you will have to go back through the main menu again
- Change Timezone
- Navigate and pick the time zone that best matches your Pi's location
If you are configuring the Pi Zero W the
Change Keyboard Layoutoption will fail so just skip it.
- Select
Generic 101-key PCand thenOK - Select
Otherand thenOK - Select
English (US)and thenOK - Select
English (US)and thenOK - Select
The default for the keyboard layoutand thenOK - Select
No compose keyand thenOK - Change Wi-Fi Country
- Select
US United Statesand thenOK - Enable the SSH Server
- Select
Yeswhen prompted to enable the SSH server
- Select
Finishand thenYesto reboot
Wi-Fi Setup
- Log in again as the
piaccount - Edit the wpa-supplicant configuration file with the SSID and PSK you configured on the IR829. You can ignore the existing lines and put the network configuration after them.
sudo vi /etc/wpa_supplicant/wpa_supplicant.conf
network={
        ssid="demo1-devices"
        psk="cisco123"
}
- Reboot to make the changes take effect
sudo reboot
- After the reboot you can check whether it was successful with the following
ifconfig wlan0
If Wi-fi connectivity fails you may have a typo in your wpa-supplicant configuration. Double-check the values as they correspond to your Wi-Fi network and try again as you will need Internet connectivity to perform the rest of the installation.
Now that the Pi is connected to Wi-Fi it will be easier to continue the configuration via SSH. Make note of the IP address from the ifconfig command output above and connect there.
Update the Raspberry Pi
- Perform an initial update of the Pi, accepting any recommended packages
sudo apt update
sudo apt dist-upgrade
Set Up Users
- Create the
piconaccount
sudo su -
adduser picon --disabled-password --quiet --gecos "Pi Console"
usermod -a -G adm,dialout,cdrom,sudo,audio,video,plugdev,games,users,input,netdev,spi,i2c,gpio picon
passwd picon
- Exit the
piaccount console session and log in as thepiconuser with the credentials you just created - Remove the default
piaccount
sudo deluser pi --remove-home --quiet
Back to Chapter 4 RWIS and Car Simulator
Back to Chapter 5 Serial DMS